
Tips & Tricks (updated Nov.19.2023)

Got a question? Call Gilles direct at 613-932-8603 or by email
A simple method for figuring out how to adjust a guitar graphic equalizer pedal
Most graphic eq pedlas have SIX slider controls that affect individual frequency ranges of your guitar's signal.
The two sliders with the lowest "numbers" (aka frequencies) would affect your guitar's E and A strings the most.
The two middle sliders would affect your guitar's D and G strings the most
The two sliders with the highest "numbers" would affect your guitar's B and thinnest E strings.
No more guessing!
How do I re-string an electric guitar?
Click here to view our illustrated overview on how to restring an electric guitar.
Do you know how those tiny little hex(allan)screws on Fender style saddles rust? If yours hasn't yet(you're lucky),go out and get one of those "precision oilers" that look like a clear fountain pen with oil inside.Use the oiler to "inject" a drop of oil into each of the screw sockets to help them from rusting due to palm sweat(yikes!).Don't go overboard with it though ,or you'll have an oil spill on your hands worse than the Exxon-Valdez.
Save unnecessary wear on your ac adaptors(wall warts) by plugging in your adaptor into your fx unit,BEFORE
you plug the other end into the wall.What you might not realize is that if you do it the other way around,the adaptor
is already "fired up" and if you happen to miss the ac socket on the pedal,even a little bit,you can cause an arc or slight
short circuit that can shorten the lifespan of the components inside the adaptor.Also,if you simply unplug the adaptor
end that connects to your pedal thinking you're safe,think again.Most adaptors are still powered up,when they're still
connected to a power bar or wall socket.leaving their internal components to slowly "cook" themselves.If you have to
leave them connected to a power bar,make sure you can actually switch the power bar itself off.
After life for a dead 4-track recorder
Got one of those older(ancient?) 4track budget recorders that used cassette tape but the cassette motor section died a mechanical death years ago? Well,dig it out of the back of the closet and check if it either has monitor out jacks or
individual (1-2-3-4)track out jacks.At the very least it should have a pair of L/R output jacks.If your unit has any of these,then you can still use the 4track's mixer section as a poor mans's submixer.You just won't be able to record directly onto the tape section,but you'll be able to use it to add some add'l audio sources(like drum mikes,or keyboards
,for example) and send this into your "real" mixer-recorder or mixer-amps stereo line in source.There's usually a pair
of these rca/phone style jacks, tucked into most of today's new gear.
Become your own detective
Here's a tricky one that pops up frequently.You have an amp setup and it decides to intermittently "act up",producing
various types of nasty sounding spurts of noise or crackles.Before you put a size12 to it,this "trick" can help determine
where in the amp, the problem could be coming from. Run a cable from your amp's pre out jack.If your amp has an
fx send jack instead,use that one(remember which one you used!).Now run that cable into a separate,different amp,
or mixer,it doesn't matter for now.Now plug your guitar into your amp and see if you can coax it into misbehaving.
Assuming your amp's starts acting up,listen to other amp(or mixer)that's connected to your pre out(or fx send)jack.
If the nasty noises show up there as well,then this is a clue that the "defect" is likely occuring somewhere in the amp's
preamp section and,NOT in the power amp section(as a general rule).This will help cut down on troubleshooting time
when repairs are needed since there's not as much looking for a needle in a haystack involved.
Okay,lets say you assume the problem's occuring elsewhere(NOT the preamp)in the amp,like the power amp section. Here's how you can check for that. Find/borrow a preamp pedal or rack preamp.Plug your guitar into this "substitute"
preamp for this test.Connect the output of this "new" preamp into your amp's line IN(or,power amp in,or,fx return)
jack with another guitar cable.Now,since you've essentially bypassed your amp's own internal preamp section,you'll
be running your isolated guitar signal straight into the amp's power-amp section.If you DON'T hear any nasties now
coming from your amp & speakers,then that likely confirms that the defect IS in the amp's preamp section.However,
if you DO hear the same old "nasties" coming out of your amp,then this'll confirm that the defect IS likely in the amp's
power amp section.
You can also use much the same process when troubleshooting studio setups or amp setups with multiple fx rack units by simply working your way,backwards.For example,let's say you have an amp setup with a 1/2 dozen different rack
processors in a box,and one day,it hits the fan and you start getting all kinds of undesirable,sounds coming out of your
setup.How to find the culprit responsible? First,check the last thing in the chain-the amp.Okay,assuming the amp's
NOT the problem,disconnect the last cable that's feeding the input of your amp.This will be the LAST cable coming out of the LAST fx unit/processor.Now plug this cable into a separate,different/spare amp.The nasty sound should now appear in this substitute amp,right?. Okay,now,disconnect and remove this last processor from "the chain".
Plug the cable from the second to last unit into your substitute amp.If the nasty sound is gone,then this will tell you
the problem is in the LAST UNIT.If the nasty sound is still there,however,then keep repeating this process,one unit
at a time,in order,till the nasty stuff disappears.This will tell you how far you have to go to isolate the offending unit!
Where's my pick?
How simple is this? Guitarists are always digging in their pockets looking for a pick,any pick.You never seem to find
one when you really need one.Okay,leave a pack of matches in your right hand pocket.No kidding.Stick your favorite
pick in the same pocket.Now take a walk.It seems no matter how much junk you stuff in that pocket,during the
course of the day, it's likely that that pick will almost always end up inside the pack of matches-where you can always find it. Try it.
Can you really hear yourself?
You're playing a small club gig and you still really need to hear some kind of monitor mix.You need a monitor but you're strapped for bucks and there's no space left on stage for a floor wedge anyway.Here's a quick & easy solution.Get your hands on a small(beginner's practice type)mini-bass amp or keyboard amp.Most players still have their original one(typically less than 40watts)they started out with,before they upgraded to a larger "beast".These one-piece little amps will work adequately,in a pinch,as a self-powered monitor.Make sure you prop this "monitor" up in the air,at ear level,NOT down near your kneecaps. Make sure it's speaker isn't aimed straight into any mic's to help prevent feedback.Start out with this ?monitor's" eq controls set at flat.Normally,this is at the 12 o'clock setting.You now have a couple of choices.You can run a cable from your mixer's monitor out jack.Or,If the guitarist or drummer on the other side of the stage can't hear you,you can locate this "monitor" closer to either of them.Run a line out from your own larger amp's line out/pre out jack into the "monitor" and set your levels appropriately.It's suggested to stick with a using a small bass or keyboard amp and NOT one of those little guitar amps.The majority of little guitar amps are designed to sound edgy & trebly,which will create feedback harder to control.Plus,their tone controls make for very "dramatic" shifts in the response(more headaches).In comparison,most small bass/kybd amps have tones controls that have smoother,less erratic curves,making them easier to work with.Their speakers also tend to sound cleaner,with less distortion than their electric guitar counterparts.
Are you on time?
You're a practicing musician that hates the monotonous click-click of metronomes but you know you have to keep
your rhytm timing up to par.Try this instead.Pickup one of those (nowadays) very inexpensive portable keyboards
that come equipped with a built in drumbox/rhythm section.There's tons of them out there being dumped for next to
nothing in bargain stores,thrift shops,garage sales,somebody's basement closet,right next to a betamax player....
Most of these have a headphone jack you can use to feed your amp's cd/line in jack or PC sound card.Start practicing
your chops with the simplest rhythm setting first,so there won't be any busy drum fills hiding any initial mistakes.
Tweak that baby
If you own a Crybaby,Dunlop or Vox Wah or similiar type that uses a worm gear and track assembly(attached to the
treadle),you can adjust where the sweet spot of the wah is on the travel of the pedal with this simple tweak.Flip the unit over and remove the cover.Look for the control connected to the toothed track.You'll see a plastic clamp,held up
against this track secured by a single screw.If you loosen this screw a little bit,slide the clamp to one side.Now, you can rotate the worm gear on the control a little,either forward or back.Put the track back in place against the worm
gear.Put the clamp back up against the track and tighten the screw.Plug in the pedal and try it out.Depending on
how much you rotate the worm gear,you can alter the spot where the wah effect kicks in.You can repeat this entire
process above till you're happy with the results.
Affordable one-two punch for bass players
Got a lower priced(but well loved) bass that you'd like to get more tone & punch out of? Can't see dropping crazy $$$
into active pickups that would be worth more than the bass itself right? We've got an affordable alternative.Plug into
a mini-equalizer pedal.You can get 6 or more bands of cut & boost for enhancing the treble,mid & bass of your bass ,and/or you can use it just as a preamp to give your bass a little extra kick.All this for less than the price of a single pickup.
Poor man's gear cases
Next time you're noodling thru Staples or Wally-Mart,keep an eye out for their "roll-backs" on camera & accessory cases,even those padded,zippered lunch bags,Many of these just happen to fit fx pedals.Their bulk priced vinyl "pencil-case" also fits a standard microphone.
Hit your local "dollar" store and you'll find Ipod/cell cases that are a great fit for your favorite harmonica.And they usually have a "loop" so you can hook this case through a belt.
For low-action acoustic guitars
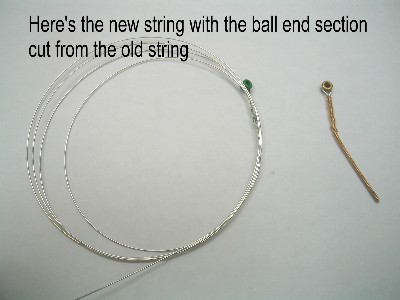
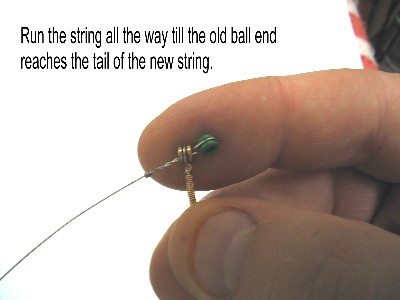
If you play an acoustic guitar with really low saddle height & string action,here's a trick to improve the tone and reduce wear & tear on your strings.Next time you change a set,thread each one of your new strings into a ball-end of
your old strings and clip it off each old string,leaving each new string with TWO balls at the end that goes into the
bridge.This new "double-ball" end will pull the string lower down into the guitar's bridge plate,so there won't be any of the wrapped string section kinking up or taking a nasty bend at the bridge pin hole . Check the pix links below on how to do this. Step One Step Two Step Three Step Four Step Five
Save some wood
If you're a drummer using those bundled dowel sticks and find them chipping & splintering all over the place,try this.
Soak them in a tall vase of water(just like celery!) to let the fibers absorb some water up thru their fibers.This will add
some weight to them ,but will also add some resilience to them so they won't be so destruction prone.Just leave them
in water long enough till the normally bleached out wood changes colour and leave them drip dry(er) before playing.
Give your bass guitar another personality
You can simulate a fretless bass tone from your existing bass? Try running it thru a chorus or vibrato fx pedal,set on
the slowest speed with a mix of about 3/4.
Want to simulate a bowed, bass cello sound while you're at it? Plug the chorused sound into a volume pedal.Pluck a
note first,then slowly bring up the volume on the pedal.With a little practice it can sound pretty convincing!
Are you intonated?
Here's a method to adjust the intonation on your electric guitar or bass with a digital guitar tuner.This applies to any
guitar with a normal 7ender style or 6ibson type bridge with individually adjustable saddles.First,make sure you've
installed a fresh set of strings & they're well stretched(see below for those details).It's pointless doing this setup with a worn set of strings.Asssuming you've stretched the strings into being stable for now,plug your guitar into the tuner,
prop your guitar so it's in the normal playing position(NOT laying flat on a table)since this will affect how accurately
you can intonate the guitar.Here's the simplest "rule" to remember when intonating. We'll call it the 'Three F" rule or,
3F's for short,okay? Pluck the open "A" string. Turn the machine head till the tuner needle displays a dead-centred "A"
.Now,fret the "A" string at the 12th fret(double dot).Where is the needle in the display? If it's to the left(flat)of the
centred "A" note,this means the fretted is flat,in relation to your reference "A" (the open,centred note).This tells you
that you have to adjust that string saddle forward,towards the machine heads.Take your suitable screwdriver and
turn the saddle adjusting screw a few turns(take it easy).Now,retune that "A" string again,by turning the machine head till the needle in the display shows a dead-centred "A" once again.Once that's done,fret the "A" string again at
the 12th fret.The needle should now be a little closer to the centre of the display.If not,no big deal,just repeat the process till the fretted 12th note matches the open A,so that they both appear centred.
To intonate the entire guitar,you repeat the same method for each string,uisng their individual DGBE,lo E as the
reference(instead of open A in this example) and remembering this simple "3F's rule"
If the Fretted(note) is Flat,then move the saddle Forward(towards the machine heads)
Okay,so what if the fretted note displays on the right(sharp)side of the "centred" reference note? Simple.If the fretted
is sharp(NOT FLAT),then there's only one direction for the saddle to go-the opposite direction.You would adjust the saddle backwards,towards the bridge till the needle displays identical readings between the open(reference) note and
the fretted note.
For the technical purists out there,yes,we're aware there's several methods for attaining even more accuracy,like the
Buzz Feiten or Earvana system equipped guitars-we just wanted to offer a simpler method anyone could do!
Want a better way to "stabilize & stretch" a new set of strings?
After you install a fresh set of strings, DO THIS: turn on your guitar tuner and starting with your lowE string, give that string a tug away from the fingerboard, stretching it outwards around the middle of the neck (don't get carried away - snapping it in the process). Now, pick that string again while checking the meter on your tuner. It's gone flat (to the left) right? Okay, now re-tune up to proper pitch again. Repeat the stretching bit, pick the string & check the tuner meter again. After doing this a number of times, you'll notice the meter won't read FLAT. You can pretty much assume that string is stretched & seated into place. Repeat this process for EACH string. After you're done you'll probably find yourself re-tuning less than you had to before you learned this trick!
Keep your guitar's finish safe
Don't "drape" your guitar strap along the fretboard and across the guitar body when putting it back into the case.
There are several organic and synthetic compounds used in guitar finishes AND most guitar straps(yes,even real leather ones)that will react with each other when left in contact,over time.This usually shows discolorations,"fogging" or missing pigments in the body finish.Also,the sweat & dirt that accumulates from your shoulder gets "transferred"
to your strings,while the strap's laying there.
Keep your rosewood fretboard clean
When changing strings,it's a good idea to scrub & clean off the scum that accumulates on the fretboard from playing.
How? At any hardware store,pick up the finest grade of "synthetic steel wool" by either 3m,Norton or ScotchBrite.
These are available in rectangular pads,you can cut to size and they don't leave "filings" stuck to pickups either.
Carefully tape off the guitar body,on both sides of the neck,in case you slip,just as a prventive measure.
Your new strings will last longer since there won't be any remaining scum to cling to the underneath of your strings.
Improve the sound of your D.I. box
If you've ever used a conventional/standard/"passive" type(with a transformer inside) D.I.(aka Direct Injection)box
to patch your instrument into the mixer or recorder,you likely encountered less than spectacular tone,lifeless tone.
That's because the "normal" way of connecting your instrument into the DI,running a cable back to your amp,and
a separate mike cable back to the board,isn't always the best.You can try this "other" method,with usually better
results(no,you wont blow anything up).Plug your instrument like you normally would,into your amp's input.
Now, take a look at your amp's front(or rear)panel and locate the line out(NOT the spkr out)jack.Some older amps
used to label it "pre" or "preamp" out.Now run a short guitar cable to the input of your DI box.Connect a mike cable from the DI box(like before)going back to the mixer input.Now,BEFORE you turn up the faders on the mixer,set your
levels on your amp where you'd normally set them,then adjust the levels at the mixer.You should notice a cleaner,
livelier sounding signal now coming from the board & PA.
Strings stuck in the block?
When it's time to replace the strings,Strat style guitars that are equipped with vibrato units are notorious for their
strings stuck in the blockend of the bridge.If this happens,take the small allen hex wrench that you'd use for adjusting the saddle heights,and stick it down the string tunnel(thru the saddle hole).A little push on the wrench is all it takes
to free up the stuck ball end of the offending string so you can slide it out of the block.
Don't dry out your guitar!
During the cold and very dry winter months,keep your instruments well humidified to help lessen "odd" problems
with string action,buzzes,etc by keeping them safe in their case.Most of us aren't aware of how little humidity there
actually is in the house during the winter months,since we still feel warm.We don't realize that it's during the nights,
(usually when we're sleeping)that the furnace cycles on for more and longer periods,trying to keep the building warm
lowering the humidity levels excessively.
Ideally,if you have ONE room in the house that you can keep the humidity level between 45 to 55%(like where most
of the houseplants are)and store your guitars in there,great.However,if that's not an option,you can keep one of those portable room humdifiers in a room with your guitars.It's easier to control the humidity level in a small room than
an entire house.You can also place a slightly soaked(not dripping wet)sponge in a perforated ziplop bag or container
and store that in the guitar's case.You might be surprised to find that sponge to be dry in a day or so!
One more trick during the winter months-If you find your guitar buzzing due to excessively low action brought on by
dry winter months,you can temporarily try going with a fresh set of strings,ONE guage thicker than what you're
normally using.Assuming your guitar can handle it,this heavier guage set will usually "pull up"' the action ,just
enough to reduce excessive buzzing.
A "poor man's Dobro style guitar
Looking for a cheap alternative to a Dobro style guitar to try out some slide playing with ? Most of us own or can aquire a low cost "starter" or "beater" guitar that's seen better days,with LESS than ideal action(string height).Many
times it's your first guitar from yesteryear,where the neck has given up the ghost and you'd need visegrips just to
fret a D chord on.Don't throw it out yet.You can buy an inexpensive "hawaiin" (aka "steel") conversion nut slips that
slips over the guitar's regular nut to raise the action.You rarely have to change out the saddle,since the action's already too high on most inexpensive "beater" guitars anyways.Now,install a fresh set of 12-54 bronze strings,tune
to DADGAD(for example),grab your bottleneck slide and let 'er rip!
Alternate tunings Chart
Here's some tunings you can try out the next time you to experiment.Starting on the left from the LowE string.
E , B(up from a), E(up from a),G#(up from g), B, E
D(down from e), A,D ,F#(down from g), A(down from b), D(down from a)
E ,A, E(up from d), A(up from g), C#(up from b), E
D(down from e), G(down from a), D, G ,B ,D(down from e)
G(up from e), B(up from a), D, G, B, D(down from e)
Got a string "sticking" up at the nut?
Rub a #2 pencil lead in the slot to lube it up. You can also use Lubriplate or Teflon grease (apllied with a toothpick) to reduce this problem.
G (third) string always out of tune?
The plain G (third) string is notorious for sounding slightly "out of tune" with itself. This seems to be inherent to a PLAIN G. If this really bugs you, try substituting a WOUND G of a similiar guage to reduce this.
Here's a quick way to adjust your pickups
Fret the high E at the highest fret and adjust the treble (end closest to the thin strings) side of the pick-up's polepieces so they're about 1/8" below the string. Do the same for the bass side (end closest to the thick strings). Another tip: if you want more bass (and sustain) from your pickups. LOWER them down into the body. If you want more bite, edge or pick attack to come through, raise your pickups closer to the strings. Remember though, you always have more treble (highs) from your bridge pickup because of it's location and you'll already have more exisiting bass (lows) because it's further away from the treble end (bridge) of the guitar.
Bridge=Bite=Treble
Neck=Mellow=Bass
Here's how to get an overall thicker guitar sound (a good one for trios)
If you're using a true stereo chorus pedal or rack, run one cable back to your guitar amp from the pedal's regular (mix) ouput as usual, and now connect a cable from the chorus' effect (wet only) output and to a spare channel on your p.a. mixer-amp. You don't have to crank up the level on your mixer for your chorused guitar, just enough to fill in. If you're running a stereo mix, turn the pan over a bit so there's more of your chorus guitar sound on the side of the stage where you and your guitar amp ARE NOT located. Only have a chorus pedal with one common effect (mix) output? No problem. You can still do some thing similiar. Plug your guitar into your pedal as usual. Now, however, connect a Ycord (with one male plug branching out to two female jacks) like this: the male end goes into your effect out jack. Connect one regular guitar cable into your guitar amp and one of the Y's female jacks. Connect another guitar cable from the remaining Y's female jack and the other end into your mixer channel. Enjoy!
Spare Strings
Amazing how many guitarists call at 2 minutes to closing time to pick up ONE FIRST STRING! They're inexpensive enough so keep a half dozen 1sts & 2nds in your case and save yourself some last minute panic attacks.
In a similiar vein...
Take a half-hour and make a note of all the fuses that your guitar amp/bass amp/p.a. mixer/keyboard uses and get some spares that you can keep with you in your guitar case in case "disaster" strikes in the middle of nowhere and the closest thing you find to a radio shack is a pirate cb station in the woods. Make sure you identify which ones are slow blow, fast blow, regular sized and mini-fuze types and don't get milli-amps and amps mixed up-the results could end up in smoke! (What's the difference between a slow blow fuse and a fast blow? Oh, about 25cents...)
Cymbal Recycling
Okay, you've finally got yourself a real decent set of Sabian / Zildjian or similiar pricey cymbals and you want to trash your cheesy, dented no-name cymbals from your first kit right? Stop. Playing percussion involves looking for different sounds so try this. Most cheeso cymbals dent the worst around the edge. If you're NOT handy with metal working tools, ask someone who is from a local metal/machine shop, body shop or even school shop teacher to trim that puppy down just past the majority of dents. Don't forget to grind down the new SHARP edges so you don't slice your fingers & sticks to shreds. Got another "victim"? Have some rivets installed for little cost. Voila! instant fx cymbals on a budget!
Want to give your snare drum a BIG FAT SOUND?
Most snare drums are shipped from the factory with wimpy little 12to24 wire snares. Try replacing it with a nice wide 40to48 wire snare. It'll also make pressed rolls more consistent sounding giving your snare an almost parade snare sound!
Need an inexpensive shaker/maracas?
Take an empty Pringles (no kidding!) chip container and fill it partially (the amount's up to you) with craft beads (from granny's house). You can finish the outside of the cylinder can with self-backed adhesive vinyl(like Mactac). After you've decided how much bead material does the trick for your shaker, run a bead of adhesive inside the edge of the can's lid to seal it in place & prevent it from popping at the worst moment. Cha-Cha!
Improve your lead playing & develop some chops!
Connect the line out (or pre-out) of your amp to the line in (you'll need a y-cord adaptor) record jacks on your ghetto blaster. Plug in as usual into your amp press record and record yourself playing nothing but straight rhytmn guitar parts/chord progressions for at least 15 minutes worth. Rewind, press play and now you're free to improvise your solo ideas over a backing rhythm player. Get pickin!
Recording Trick 1
Try some natural reverb: place your small practice amp IN the empty bathtub (make sure it ISN'T filled with water or that granny's takin' a soak at the time) and hang your recording mike over the open shower curtain rod. Press record.
Recording Trick 2
Take your "recording" amp and turn it around so it faces into two adjacent walls (refererred to as kitty-corner). Place your recording mike between the amp's speaker and the corner location. Varying the distance between the amp and the corner will change the sound the mike (and your recorder) picks up.
Recording Trick 3
Want your brass (trumpets) synthesizer patch to sound more realistic? Run your keyboard amp's output into a METAL horn equipped speaker cabinet (instead of just paper coned loaded cabinets). Stick a recording mike in front of the METAL horn (varying it's distance) and mix it with the synth's regular signal to your liking.
Finding yourself breaking strings often at the ball end?
Try "tinning" (applying a thin coating of molten solder with the help of a soldering pencil) to the wrapped ball end of the string to toughen it up. *
Cure your drumsticks from slipping out of your hands
If you find your drumsticks slipping out of your hands once you start sweating, take a 220 grade sandpaper & sand the glossy finish off at the grip end. This usually solves the problem.
You find your drumsticks splintering up a lot & getting "dented" from heavy use?
Buy some heat-shrink tubing (of the right diameter to slip over each stick) and slide it over the area that's usually affected (from the butt-end up to the 3/4 length). Heat it up uniformely enough to just "grab" snugly around the stick. Ta-da! Instant Grips.
Do you find leaving your guitar tuner "inline" in your pedal chain adds a "dullness" to your tone?
If you have a line out jack on your amp (most do) connect a short guitar cable from this jack to the input of your tuner. (you don't need to run another cable from the tuner to anything). You don't have to plug your guitar into the tuner. Your guitar tuner will get its signal from your pre-out jack so you can leave your guitar plugged in like before, without having to connect/disconnect your tuner. (Remenber, though, if you have a chorus effect on the amp, make sure it's switched off when tuning. The "doubling" effect from the chorus usually "confuses" most tuners).
Having trouble remembering or telling the difference between speaker cables & guitar cables?
No, it's not 50 cents a foot-ta-dum-dum... Most twin-type wires have identical sized and looking conductors. Unscrew the plug's barrel and you'll see two conductors of the same size inside & out. On a GUITAR cable, unscrew the plug's barrel and you'll 99.99% of the time see two different sized conductors:a smaller diameter centre one & a larger braided one surrounding the smaller one.
Is your combo amp "cranked" and you still can't hear it properly when moving around the room?
Combo amps tend to be very directional and since your ears aren't located in your knee-caps (they're about 4 feet higher) try "jacking up" your amp up least three feet OFF THE FLOOR, on some milk crates, a STURDY bar stool or even a keyboard stand. You'll be surprised at what you'll suddenly hear.
Save some needless wear & tear on your amp with this tip
I see guitarists changing guitars or trying/switching between cables & pedals and constantly switching the amp's power switch on & off & back on every time they make a change. With tube amps, it's the stand-by switch that gets toggled back & forth. Without getting overly technical about collapsing fields & spikes & surges because of this constant switching back & forth, DO THIS: just turn the amp's pre-amp gain (aka input gain, pre-level) down to ZERO every time you have to change guitars, pedals, cables. Why? When the amp's pre-gain (input level) is turned to ZERO, a large internal resistance (inside your amp) comes into play "blocking" any nasty pops/bleats/buzz/snaps etc from reaching your amps amplifying circuits.
Make your strings last a little longer
Wipe them down "properly" after you're finished playing. Take a clean cloth and slip it UNDER each string one at a time, and "draw" the cloth down the length of each string, from the nut to the bridge. You'll actually see black streaks on the rag. If you think your strings are clean just by looking at the surface, this isn't accurate. Sweat from your hands actually "clings" to the underside of the string (just waiting to accumulate with dust inside your guitar case!). This is really evident on acoustic strings too. You can pretty well guess the strings are "toasted" when you see the color changing on the outer "wrap" portion. The salt & acid in sweat has worked it's way to the inner "core" by now so wipe 'em down when you're down!
If you play in a lot of smoky environments or live close to constant doses of air pollution.
Every couple of days (ok, let's say-at least once a week) simply give ALL the controls on your gear (amps / racks / guitars) a good turn back & forth a couple of times each to "scrape" the contamination off of the controls conductive element (that horse-shoe shaped thingie inside the potentiometer-you can't see it. Believe me, it's in there!) Doing this will help reduce the "scratchies" when you turn it up to 11 (!)
That's it for this installment of T&T Keep on pluckin'
Gilles Grignon